| OS | Windows95/98/Me/NT4.0/2000/XP |
|---|---|
| CPU | Pentium 200MHz (minimum), or better (400MHz is recommended) |
| Memory | 64MB (minimum) |
| Resolution | 1024 x 768 pixel or better, 65536 colors (minimum) |
DELETER CG illust2.0 is the painting and drawing tool, that ensures a swift movement that you will experience with a tablet.
This file contains the product information, quick reference, and guide for the basic techniques.
By following through Quick Handling Manual, you can actually practice how to handle basic tools.
1. Creating new images
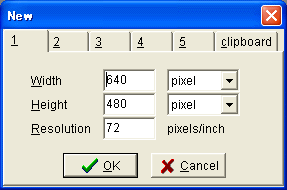
"New" command lets you create a blank, untitled image.
Choose File > New. You can set up the canvas size at this time.
For instance, let's create the image with 500 pixel (width) x 500 pixel (height).

This newly appeared window is your canvas.
The white sheet is a paper where you can draw in, and the gray frame is a margin.
2. Drawing with brush tools

Now, let's use brush tools.
Brush tools let you define the painting and editing effects.
To display brush tools:
Choose Window > Show Brushes
See Using the brush tools
Click on "Watercolor," and then choose the color from "Color" window or "Color Palette" window.
"Color" enables you to create colors, and "Color Palette" can hold colors you created.
At this time, just click on any color you like in "Color Palette."
And then, go back to the blank canvas that you just created, and create anything.
By specifing the brush attribution, you can give various effects on strokes.
*Using "blur" on blank space brings you nothing.
3. Using layers
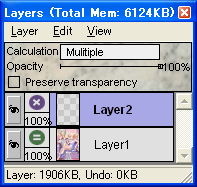
Layers tool enables you to work separately on the image you are using currently and the others you aren't.
Think of layers as sheets of acetate stacked one on top of the other. When there is no image on a layer, you can see through to the layers below.
Changes to an image affect only the highlighted or active layer. Before starting to work on an image,
you select a layer to make it active, and only one layer can be active at a time.
The active layer is highlighted in blue, indicating that the layer can be modified. (see the illustration above)
Let's try to draw an apple.
Create a new file. See Starting a drawing
Draw an outline of an apple on "Layer 1" with black.
Go to "New" in Layers window and choose "Create MUL Layer" as a file name "Layer 2."
Activate Layer2 and put a color on the apple. No matter you painted over the outline of the apple, the line would remain.
When you failed to paint or didn't like an image on the specific layer, go to "Layers" window > "Layer" > "Delete."
You can easily discard the active layer.
Whenever you draw or edit an image dealing with Layers, you need to make sure on which layer you are working.
Active layer is highlighted in blue. You select a layer to make it active, and only one layer can be active at
a time.
See Using layers.
4. Selecting a specific area
You make selections when you want to deal with just a part of an image. After making a selection, you can only draw or edit within the selection. Nothing selected means that an entire screen is selected.
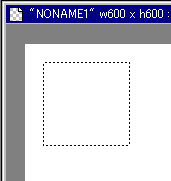
Rectangular Selection
Let's make a selection.
Look at the toolbox. You will see a dashed rectangle with a gray background.
Click on it and drag in the image to select with rectangule. If you draw something over the dashed rectangle, drawings within the selection would only appeare.
Under that condition, hit the "Insert" key. The selection would be filled with a current color slection.
You can hold those selections on layers.

Selections stocked on several layers
When you want to release the selection, go to "Select" > "Deselect."
After you deselected, hit the "Delete" key. "Delete" key is a shortcut for clearing selected images.
If you select an image and hit the "Delete" key, only within the selection will be cleared. However, as described avobe, nothing selected is same as whole screen is selected.
Therefore, without making a selection and hit the "Delete" key makes the active layer all clear.
5. Saving a file
To completely save the drawing and its layers, selections, and more information made by DELETER CG illust2, the file
should be saved in OCI file format(*.oci), which is exclusive use for DELETER CG illust2. OCI format only keeps all the layers, selections, and more information.
However, this exclusive format can be opened by the DELETER CG illust2 program.
If you want to upload the drawing on Web or give the file to ones who do not have DELETER CG illust2,
you would need to save in Bitmap or JPEG formats.
Go to "File" > "Save As." And then, choose a different format.
To switch over tool modes by a keyboard, each tool has the alphabetical keys.

| [B] : Brush
[O] : Figure Drawing [K] : Paint Bucket [N] : Line [M] : Rectangular Selection [W] : Automatic Selection [I] : Color Sampler |
[V] : Move
[P] : Figure Filling [G] : Gradient [T] : Text [L] : Polygonal Selection [X] : Text Selection [C] : Crop |
* There is no shortcut for Zoom and Move tools.
In case of the tools which have hidden tool modes, hidden tools pop up by holding a cursol on each icon.
The followings are tools which have hidden modes.
[N] : Line
* Singular Line [Line connected between two points]
* Polygonal Lines [Lines connected from the start point to the end point determined by double-clicked]
[O] : Figure Drawing
* Rectangular [Drawn by dragging]
* Circle [Drawn by dragging]
* Polygon [Drawn by connecting from the start point to the end point determined by double-clicking]
[P] : Figure Filling
* Rectangular [Filled by dragging]
* Circle [Filled by dragging]
* Polygon [Filled by connecting from the start point to the end point determined by double-clicking]
[M] : Rectangular Selection
* Rectangle [Created by dragging]
* Circle [Created by dragging]
[L] : Polygonal Selection
* Freehand [Created by dragging]
* Polygon [Created by connecting from the start point to the end point determined by double-clicking]
When you point the pointer several times to make a polygonal figure and want to undo the last point, just right click anywhere to cancel it.
Some tools have an option window which is poped up by double-clicking on each icon.
However, this is a temporary operation. We are planning to exclude the double-clicking system
for displaying an option window in the near future.
[K] : Paint Bucket
* Selection Range [The value that decides the softness of the borderline]
* Object [To which object you want to apply the action (Active image / Displayed image)]
[W] : Automatic Selection
* Selection Range [The value that decides the softness of the borderline]
* Object [To which object you want to apply the action (Active image / Displayed image)]
Selection mode enables you to fuse or eliminate selections by the combination of various keys.
The followings are option keys on a drawing window.
![]()
Normal, Add, Subtract, Move
Cursol changes when you edit a selection.
[Shift] + select : Add a new selection to the existing selection
[Ctrl ] + select : Subtract a selection from the existing selection
Drag on a selection : Move a selection
Attention
When you want to merge or subtract selections on different layers, you can drag and drop
the black-and-white selection preview on the left side in Selection window onto another preview. At that moment, some available options pop up.
You can select how you want to edit selections in this option window.
Double-click on a selection layer in the Selection window : Edit the selection
Fusion of selections on different layers : Drag and drop a layer onto another layer
Order of selection layers : Drag and drop a layer to in between two layers
DELETER CG illust2.0 has various different effects that you can apply onto any combination of layers.

Calculation : The effects when you combine two or more layers
[Normal] : Overlap an image on top layer on bottom layer.
[Multiple] : Mix colors on two layers
[Addition] : Make colors lighter on bottom layer as same value as colors on top layer
Higher value makes lighter effect.
[Subtraction] : Opposite to "Addition."
Opacity : The effects of how visible a layer is
[100%] : Visible completely
[50%] : Intermediate between visible and invisible
[0%] : Invisible at all
Preserve Transparency : This allows you to draw only the area where something is already drawn.
SeeMaking color and tonal adjustments.
Visibility icon : Layer visibility. You can switch over the visibility by clicking on eye icon.
Calculation icon : Shown by (=, +, -, *)
Opacity icon : Shown in %(percentage)
Layer bar : Double-click on a layer you want to edit.
* If you want to change an order of layers, drag and drop a layer bar to in between layers where you want to relocate it.
There are five brush types, but only four brushes are displayed. When you wan to use the other brush, you just stay a cursol on one of any brush. The other icon wil pop up shortly.

When using the brush tools, consider the painting effects you want:
[Pen/Pencil] : Create hard- or soft-edged freehand lines
[Watercolor] : Create blotched freehand lines
[Airbrush] : Create more diffused-edged freehand line
[Blur] : Dim lines
[Eraser] : Erase images
In DELETER CG illust2.0, you can select or create colors from "Color" or "Color Palette" windows.
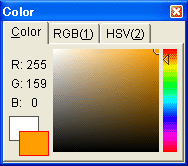
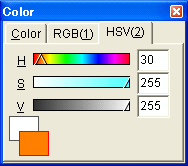


Color palette is mainly used for stocking colors.
When you open DELETER CG illust2.0 without any saving data on Color Palette, the program automatically read in default.opl.
If you saved a new color palette under default.opl, you could load it every time you start the program.
To display the setting menu, right click on anywhere in Color Palette window.
If you click on a blank space, you can add colors on a palette.
To change colors already existed in the palette,
| Shift+Left click | Switches colors |
| Ctrl+Left click | Deletes the selected color |
| Shift+Ctrl+Left click | Adds color into the pallet |

* You can set up Brush density on a keyboard. See Shortcuts list
In DELETER CG illust2.0, layer resolution will be formalized (R, G, B, A) = (255,255,255, 0),
when you create a new layer.
RGBA changes by drawing on a layer.
Checking the option "Preserve Transparancy" in Layer window means to draw only on RGB colors without effecting in a blanck space. Therefore, you can get an effect like a Mask. Colors that anti-alias are applied will be changed under preserved.
* Anti-alias will be executed by calculating "A" (Opacity.)
Tonal adjustments filters have no effect onto transparency. Therefore, you cannot adjust colors in the area where nothing is drawn.
The followings are frequently used shortcuts. See "Application Menu" to know other shortcuts.
[Ctrl][+] or [SPACE][Ctrl][Click]
: ZoomIn
[Ctrl][-] or [SPACE][Ctrl][Alt][Click] : ZoomOut
[Ctrl][Alt][+] : ZoomIn [Automatically increase the apparent size of the window]
[Ctrl][Alt][-] : ZooOut [Automatically decrease the apparent size of the window]
[Ctrl][Z] : Undo
[Ctrl][Y] : Redo
[Delete] : Clear an active layer
[Insert] : Fill an active layer with selected color
[SPACE + drag] : Move a screen
[Alt + drag] : Rotate a screen ([Alt]+[Click] back to normal position)
[Ctrl][Alt][drag] : Change a pen size by dragging a cursol horizontal
[Right Click] or [Shift + Click] : Color SamplerFTake in a color that a cursol points
[Tab] : Shows/Hides Tool box
[A] : Choose the Pen tool in Brush window
[S] : Choose the Watercolor tool in Brush window
[D] : Choose the Blur tool in Brush window
[F] : Choose the Eraser tool in Brush window
[E] : Move to left to choose a Brush setting tab
[R] : Move to right to choose a Brush setting tab
[1] : Sets the Opacity as 10%
[2] : Sets the Opacity as 20%
[3] : Sets the Opacity as 30%
[4] : Sets the Opacity as 40%
[5] : Sets the Opacity as 50%
[6] : Sets the Opacity as 60%
[7] : Sets the Opacity as 70%
[8] : Sets the Opacity as 80%
[9] : Sets the Opacity as 90%
[0] : Sets the Opacity as 100%
Q. How can I change the Brush drawing cursol?
A. Have ready the cursol file "ocPaint.cur" in a folder in the executing file.